Table of Contents
“Good is the enemy of Great.” – John Collins
Rifle Zero | Considerations
Precision rifle shooting requires careful consideration of various factors to achieve accurate, precise, and consistent shot placement. Zeroing is a crucial aspect of precision rifle shooting, and there are several options available to shooters. We will cover, or for many, revisit some basic tenets of zeroing and discuss what options are out there, why they should be considered, the thought behind those zeros, and why some zeros might not be appropriate. For instance, while 50/200 yard zero is a popular option and seemingly the easiest button, it may not always be the best choice due to the many variables present in today’s wide variety of shooting platforms. While some methodologies will give you accuracy, when dealing with zeros, we are after precision. Consideration of variables such as barrel length, bullet weight, ballistic coefficient, velocities, and optic-height-over-bore means that a standardized rifle zero, or variation thereof, might not be appropriate for a non-standard rifle. Considering this, we will also discuss the different zeroing options available and the importance of considering how your platform will be utilized to inform your decision.
Factors to Consider
It’s crucial to ask ourselves essential questions such as,
“What am I employing this system for?”
“Will the system be used for target shooting at a static range and prescribed distance, hunting, competition, or tactical applications?”
“What is the environment my rifle will be used in?”
“What is the maximum effective range of my chosen ammunition?”
“What is the expected target size, or rather, vital radius of my target?”
“How bad is it if I miss?”
Answering these questions will bring a level of intentionality when completing your rifle setup. We want to get to a point where our gear is concerned, that decisions are to achieve fact-based logical goals rather than, “Well, that’s what someone else does, or it’s what’s always been.” Based on your setup and intended usage, you can select from various zeroing approaches, such as a 100-yard zero, a 50-yard zero, or a hybrid zero, which can be based on the desired maximum point-blank range. Choosing the appropriate zeroing strategy involves careful assessment of these fundamental questions.
The What
But first, what is a zero? A zero is where you have intentionally aligned your sights, Point of Aim (POA), where the bullet’s Point of impact (POI) is at a given range. This doesn’t necessarily mean that the POA is exactly where the POI is, though. Sometimes, people will create offsets, or they will zero such that the bullet’s POA is a prescribed distance from the POA. The important factor is establishing a consistent and known relationships between the POA and POI.
Axes of Consideration
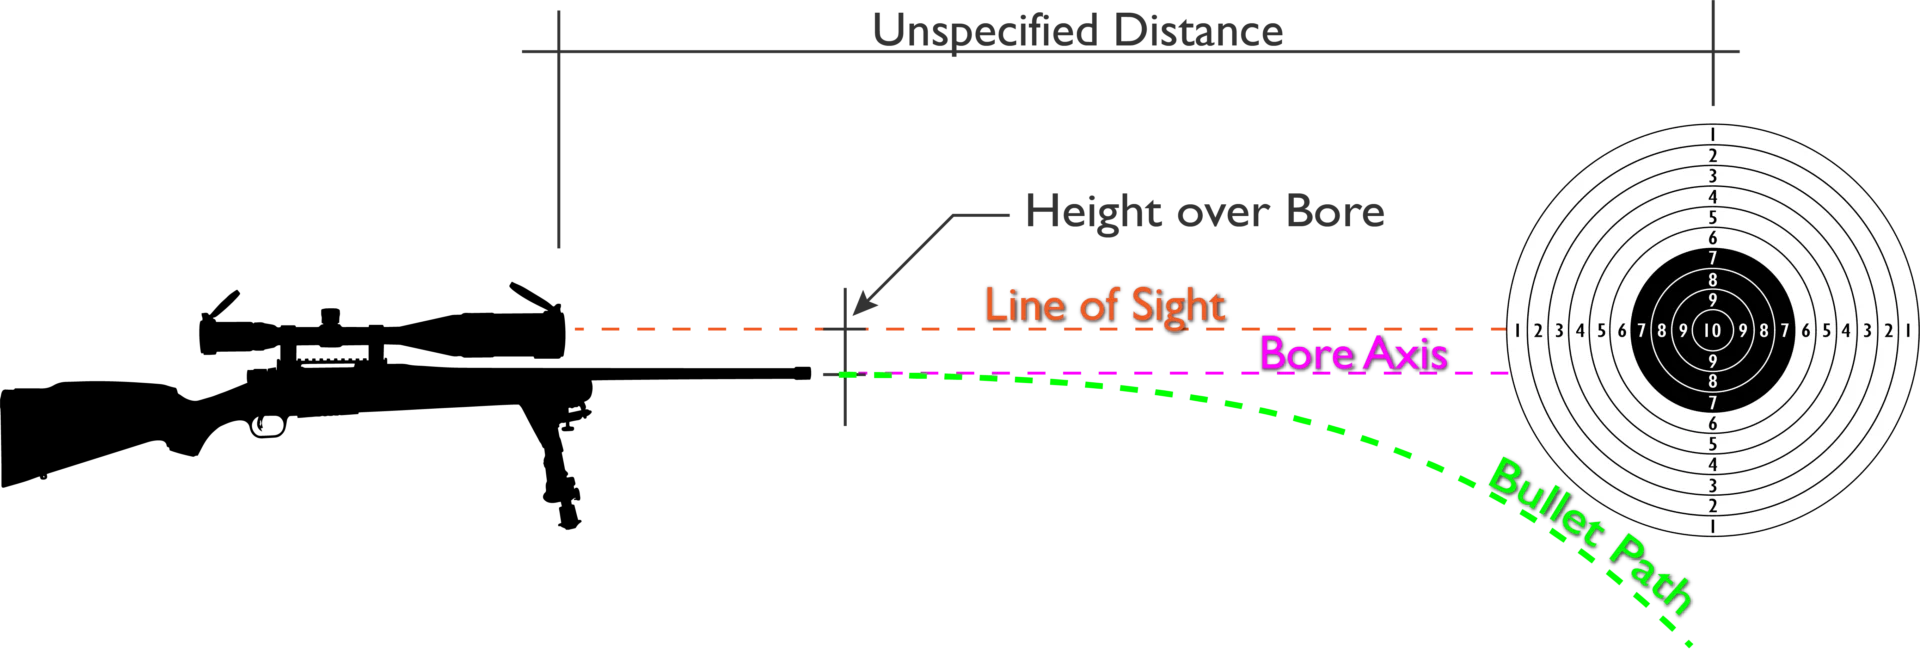
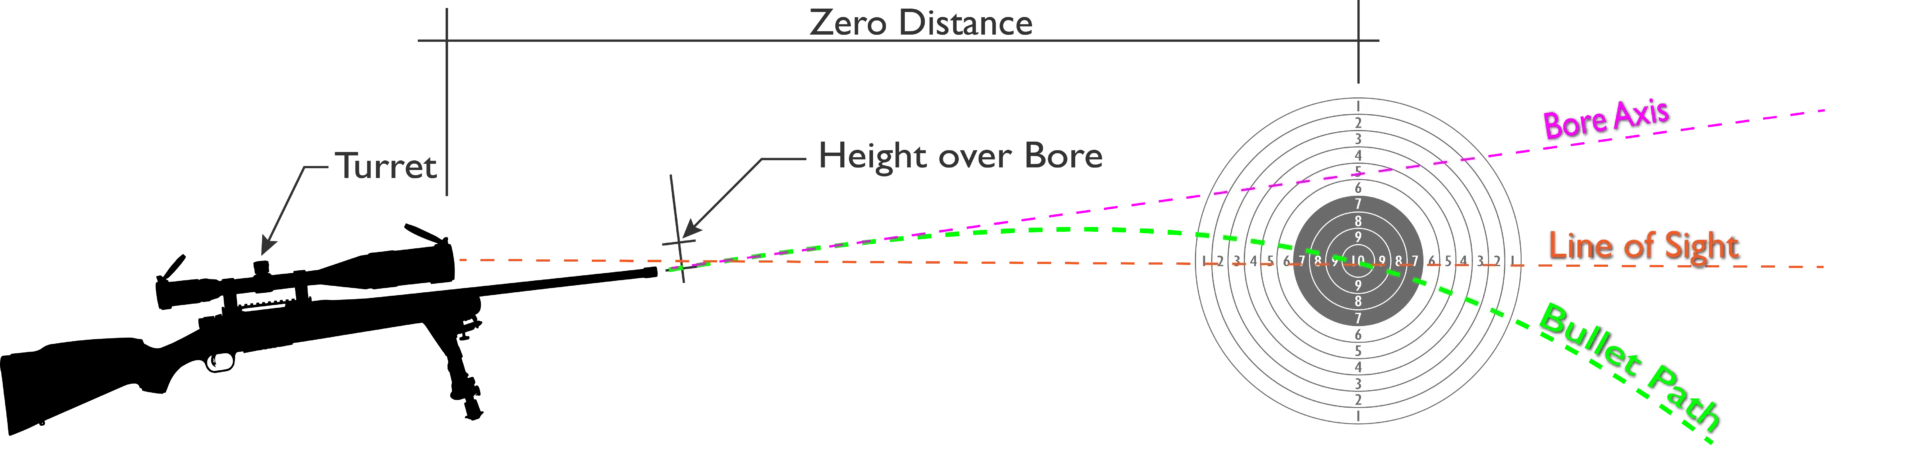
You will see here in Image 1.1 the various axes of consideration regarding your firearm.
- Line of Sight – Relates to the Sight Picture when viewing through your optic or sights at the target.
- Bore Axis – Refers to where the barrel is pointed.
- Bullet Path – Refers to the amount of drop from the bore axis after the bullet has exited the crown at a given time or distance.
Due to the Height Over Bore, when parallel, the Line of Sight and Bore Axis will be aimed at different points on the target. Couple this with the Bullet Path; you will see a wide dispersion of your POA versus your POI. It is important to note that bullets will immediately start to fall back to the earth once it leaves the barrel. There are no inherent lift properties of a bullet; however, there are mitigating factors that can affect this phenomenon when dealing with input from wind, but that’s a much later chapter.
Aligning POA & POI
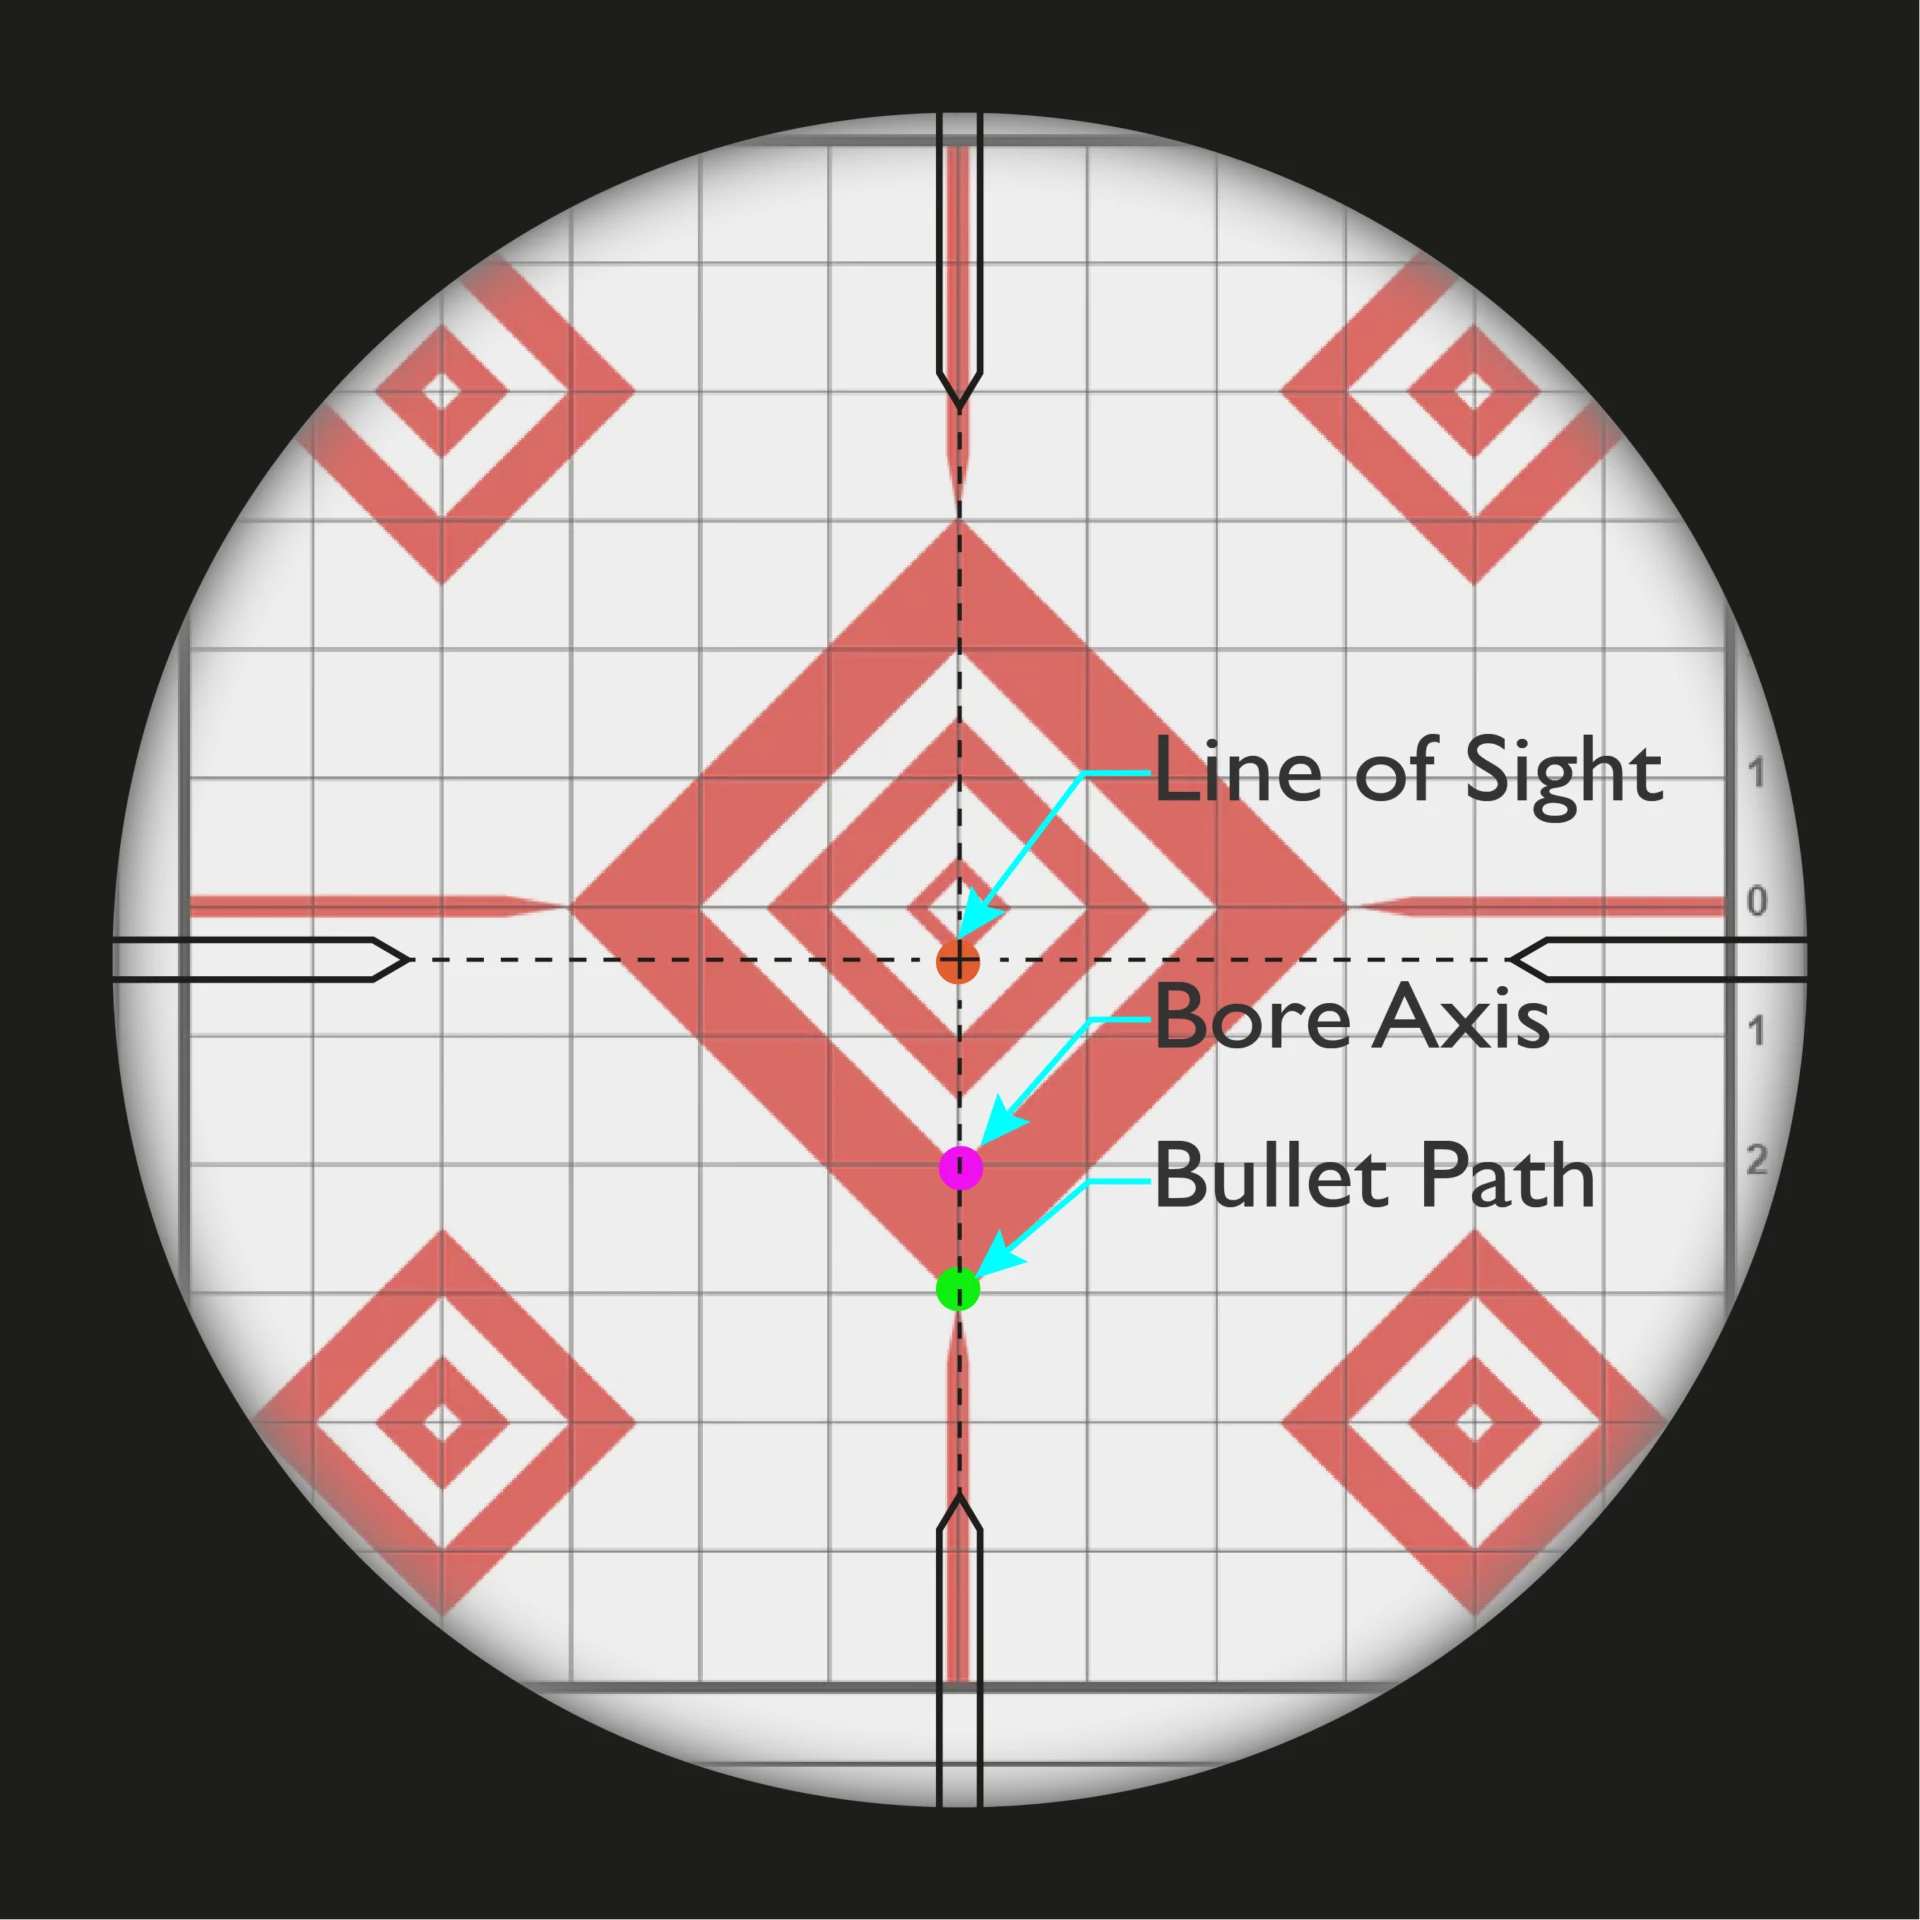
In Image 1.2, you will see that we have raised the Bore Axis of the Rifle so that the Bullet Path coincides with the line of site. From viewing diagrams similar to 1.2, people often think that the bullet has a lift property as the trajectory shows the bullet above the line of sight. We have kept the Bore Axis diagram in place so that you will see that the bullet is falling away from the barrel’s axis towards Earth.
This diagram is to show the basic concepts. At 100 yards zero, the drop in real life is nowhere near as extreme and is merely for illustrative purposes.
There are a multitude of other nuanced zeros people execute to achieve specific goals. Some will offset their POA/POI to keep their aiming Point clean. Some will not be able to match the POA with the POI due to the system’s constraints, and they will often notate this offset in a ballistic calculator. Nonetheless, a zero is the intentional relationship between the POA and the POI with what should be a high degree of precision.
Types of Zeros
Traditional Rifle Zero or 100-yard Zero
A Traditional rifle zero, for lack of a better term, is the most common method of zeroing a rifle and can be a truncated process from fully fleshing out all the necessary considerations. Like all zeros, it involves adjusting the sights to align the POA with the POI at a specific distance of 100 yards. The advantage of traditional zeroing is that it is a straightforward process. The 100-yard distance is ideal as it limits the amount of time outside forces can impact your bullet path. Forces such as Wind, Spin Drift, and Aerodynamic jump all compound to affect the bullet when exposed to them for longer amounts of time and further distances. Unless it’s an extraordinary amount, within 100 yards, wind and such factors don’t have enough time to alter the bullet path drastically for any coherent effect to be measured. Hence, the biggest determining factor for the resultant POA and POI relationship is the axes.
Travel Time for Various Calibers as Measured at Range
| Cartridge | Velocity from Barrel (fps) | Time of Flight 100 Yards (seconds) |
|---|---|---|
| 6 Dasher – Berger 105 gr. VLD | 2864 | 0.108 |
| 6.5 Creedmoor – Berger 140 gr VLD | 2600 | 0.119 |
| 6.5 PRC – Berger 156gr EOL | 2912 | 0.105 |
| 5.56 55gr FMJ | 3042 | 0.102 |
As demonstrated in the table above, the travel time of as little as 1/10th of a second creates a situation where other variables cannot impart impactful differences down range and relegates the results to the A) ability of the shooter to execute consistent grouping via fundamentals B) the alignment of the axes to achieve the desired relationship of the POA and POI and C) the consistency of the ammunition. It is for these reasons we caution people from zeroing at extended ranges, namely anything at 200 yards or beyond. When zeroing at extended distances, one will start to see how environmental conditions affect the results down range in greater magnitudes.
That said, because of this distance, it is important to remember that this zero does not account for the aforementioned variables beyond your zero. It is often only the bottom rung, the Nadir, from which you start to understand what your rifle is capable of. Unfortunately, many will get that 100-yard zero and call it a day, often guided by the fact they do not intend anything further than an occasional 150-200-yard shot, which is boring. Stretch the legs of that rifle and see how far you can push it!
This “traditional” zero has variations, from the 100-yd zero to “2” high at 100-yd” because “it’ll be dead on at 200 yds” and so on and so forth. Often, these views are truncated versions of other zero options we will discuss. However, we are after extreme precision, likened to the precision tool we are wielding, and probably spent a pretty penny for.
The 100-yard zero is appropriate for a scoped rifle with adjustable turrets. As depicted in the image below, you will adjust your Bore Axis to compensate for the Height over Bore distance at 100 yards. Once your round reaches that 100-yard point, it will continue to fall back away from the Line of Sight axis. The highest point that your round will reach in relation to the line of sight is called the “Terminal Ordinate.” In the 100-yard zero, that will be 0.
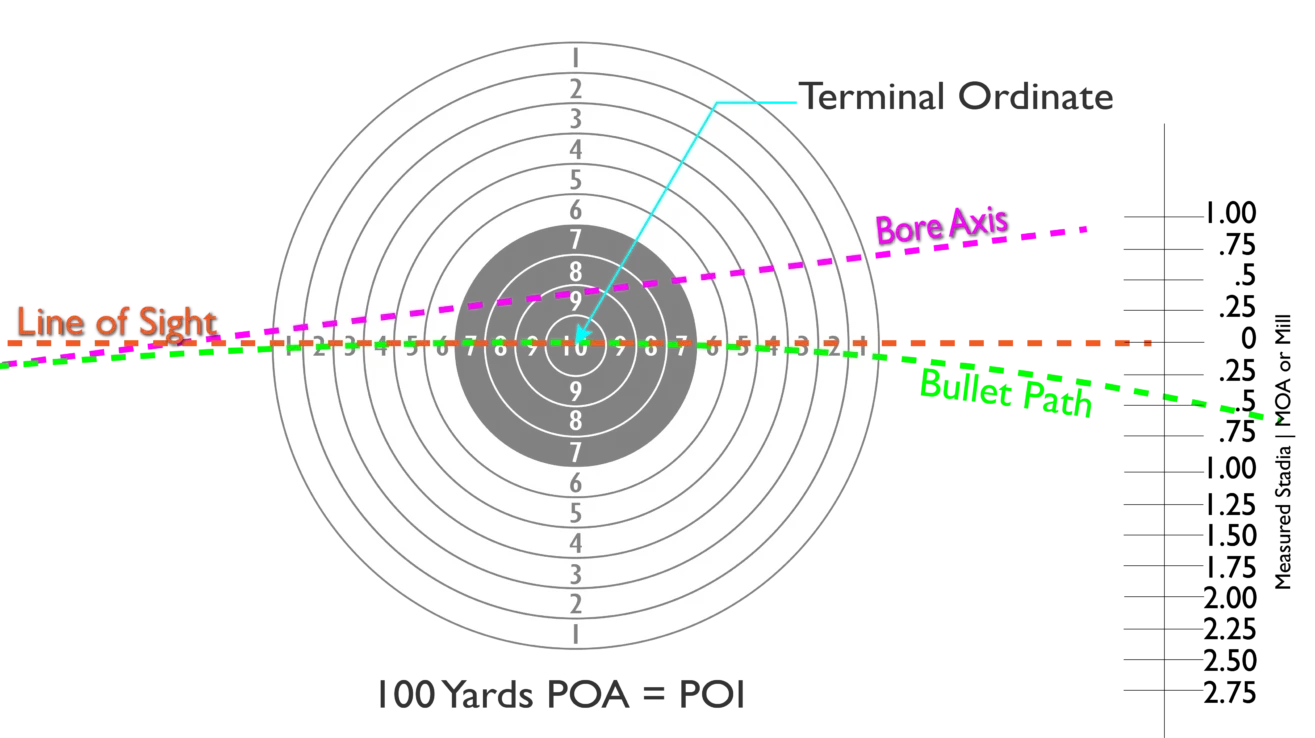
In the Diagram above, you will see an extension of the bullet path past the zero distance and a representation of an angular scale. Whether you are using MOA (Minutes of Angle) or Mils (Milliradian), these angled units of measure will help you to determine the amount of adjustment necessary to raise the bullet path to realign with the Line of Sight at a given distance.
200-yard Rifle Zero Basic Concept
As is often the case with “200 Yard Zeros,“ some people will make it so that when the POA is at 100 yards, the bullet POI is 1” above that point and call it a day, assuming that difference means they are zeroed at 200 yards. While the concept of this methodology is on the right path, we will put the exactitude necessary to achieve a true 200-yard zero given different rifle platforms in the table below. The concept is not bunk by any means, but our argument is for erring on precision that reflects the precision these tools are capable of. We don’t think that spending thousands of dollars of investment in a rifle capable of 1/4 MOA, you should just wing it when it comes down to the brass tacks of the round impacting the target you are attempting to hit with great precision.

Illustration table of travel time for the same calibers at 200 yards.
| Cartridge | Velocity from Barrel (fps) | Time of Flight 200 Yards (seconds) | Drop at 200 Yards | POA/POI w 1″ High Offset | Offset of 200 with 1″ High @ 100 Yards |
|---|---|---|---|---|---|
| 6 Dasher – Berger 105 gr. VLD | 2864 | 0.223 | -11.516″ | 188 Yards | -0.20 MOA (-.4″) |
| 6.5 Creedmoor – Berger 140 gr VLD | 2712 | .233 | -12.883″ | 152 yards | -0.93 MOA (-1.86″) |
| 6.5 PRC – Berger 156gr EOL | 2912 | .216 | -11.224″ | 201 yards | 0.03 MOA (+0.2″) |
| 5.56 55gr FMJ | 3042 | .211 | -11.745″ | 240 yards | 0.59 MOA (1.18″) |
We are including the end result for these cartridges if the zero at 100 yards was set at 1″ high. We are also including the Height over Bore of each cartridge rifle used in the velocity data acquisition.
Specs of Rifles used in Calculations for reference:
- 6 Dasher | 1:7.5 | 2.32″ Heigh-Over-Bored (HOB)
- 6.5 Creedmoor | 1:8 | 2.00″ HOB
- 6.5 PRC | 1:8 | 2.50″ HOB
- 5.56 | 1:8 | 3.5″ (14.5″ Barrel) HOB
Evaluation of the Impact of a 9 O’Clock 5 MPH and 10 MPH Wind at 200-Yard Distance
| Cartridge | Velocity | 5 MPH MOA | 5 MPH Inches | 10 MPH – MOA | 10 MPH Inches |
|---|---|---|---|---|---|
| 6 Dasher – Berger 105 gr. VLD | 2864 | 0.66 | 1.32″ | 1.22 | 2.44″ |
| 6.5 Creedmoor – Berger 140 gr VLD | 2712 | 0.63 | 1.26′ | 1.32 | 2.6″ |
| 6.5 PRC – Berger 156gr EOL | 2912 | 0.51 | 1.02″ | 0.93 | 1.86″ |
| 5.56 55gr FMJ | 3042 | .68 | 1.36″ | 1.28 | 2.56″ |
These distances will fall within a vital zone target, explained a little later. You can see the variances between calibers, and we could go a bit further with the effects of different Heights over Bore for more illustrative purposes. It is also important to note that the differences in all these charts are in isolation. Compound the variances with ammunition inconsistencies, shooter fundamental inconsistencies, and environmental changes, and you will see larger groupings that result in a “fuzzier” resolution of the true picture of the rifle’s accuracy.
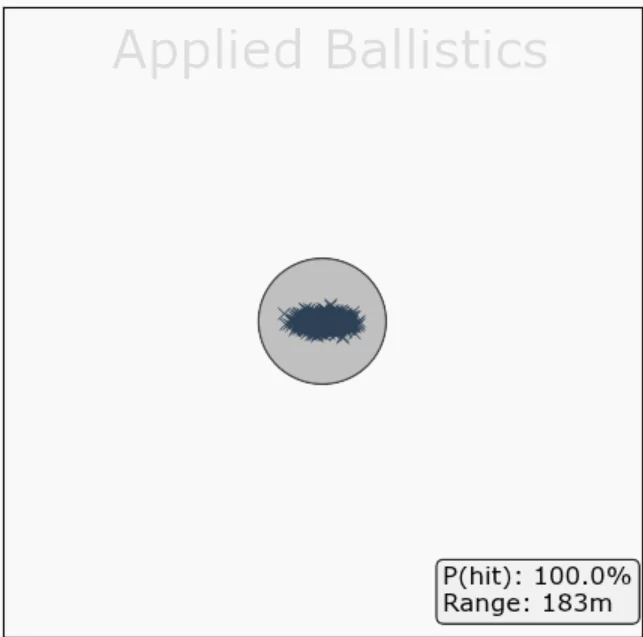
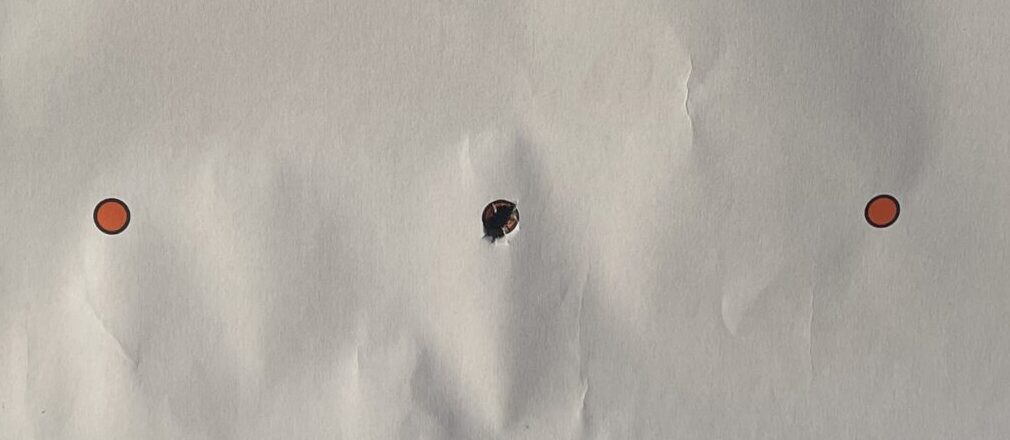
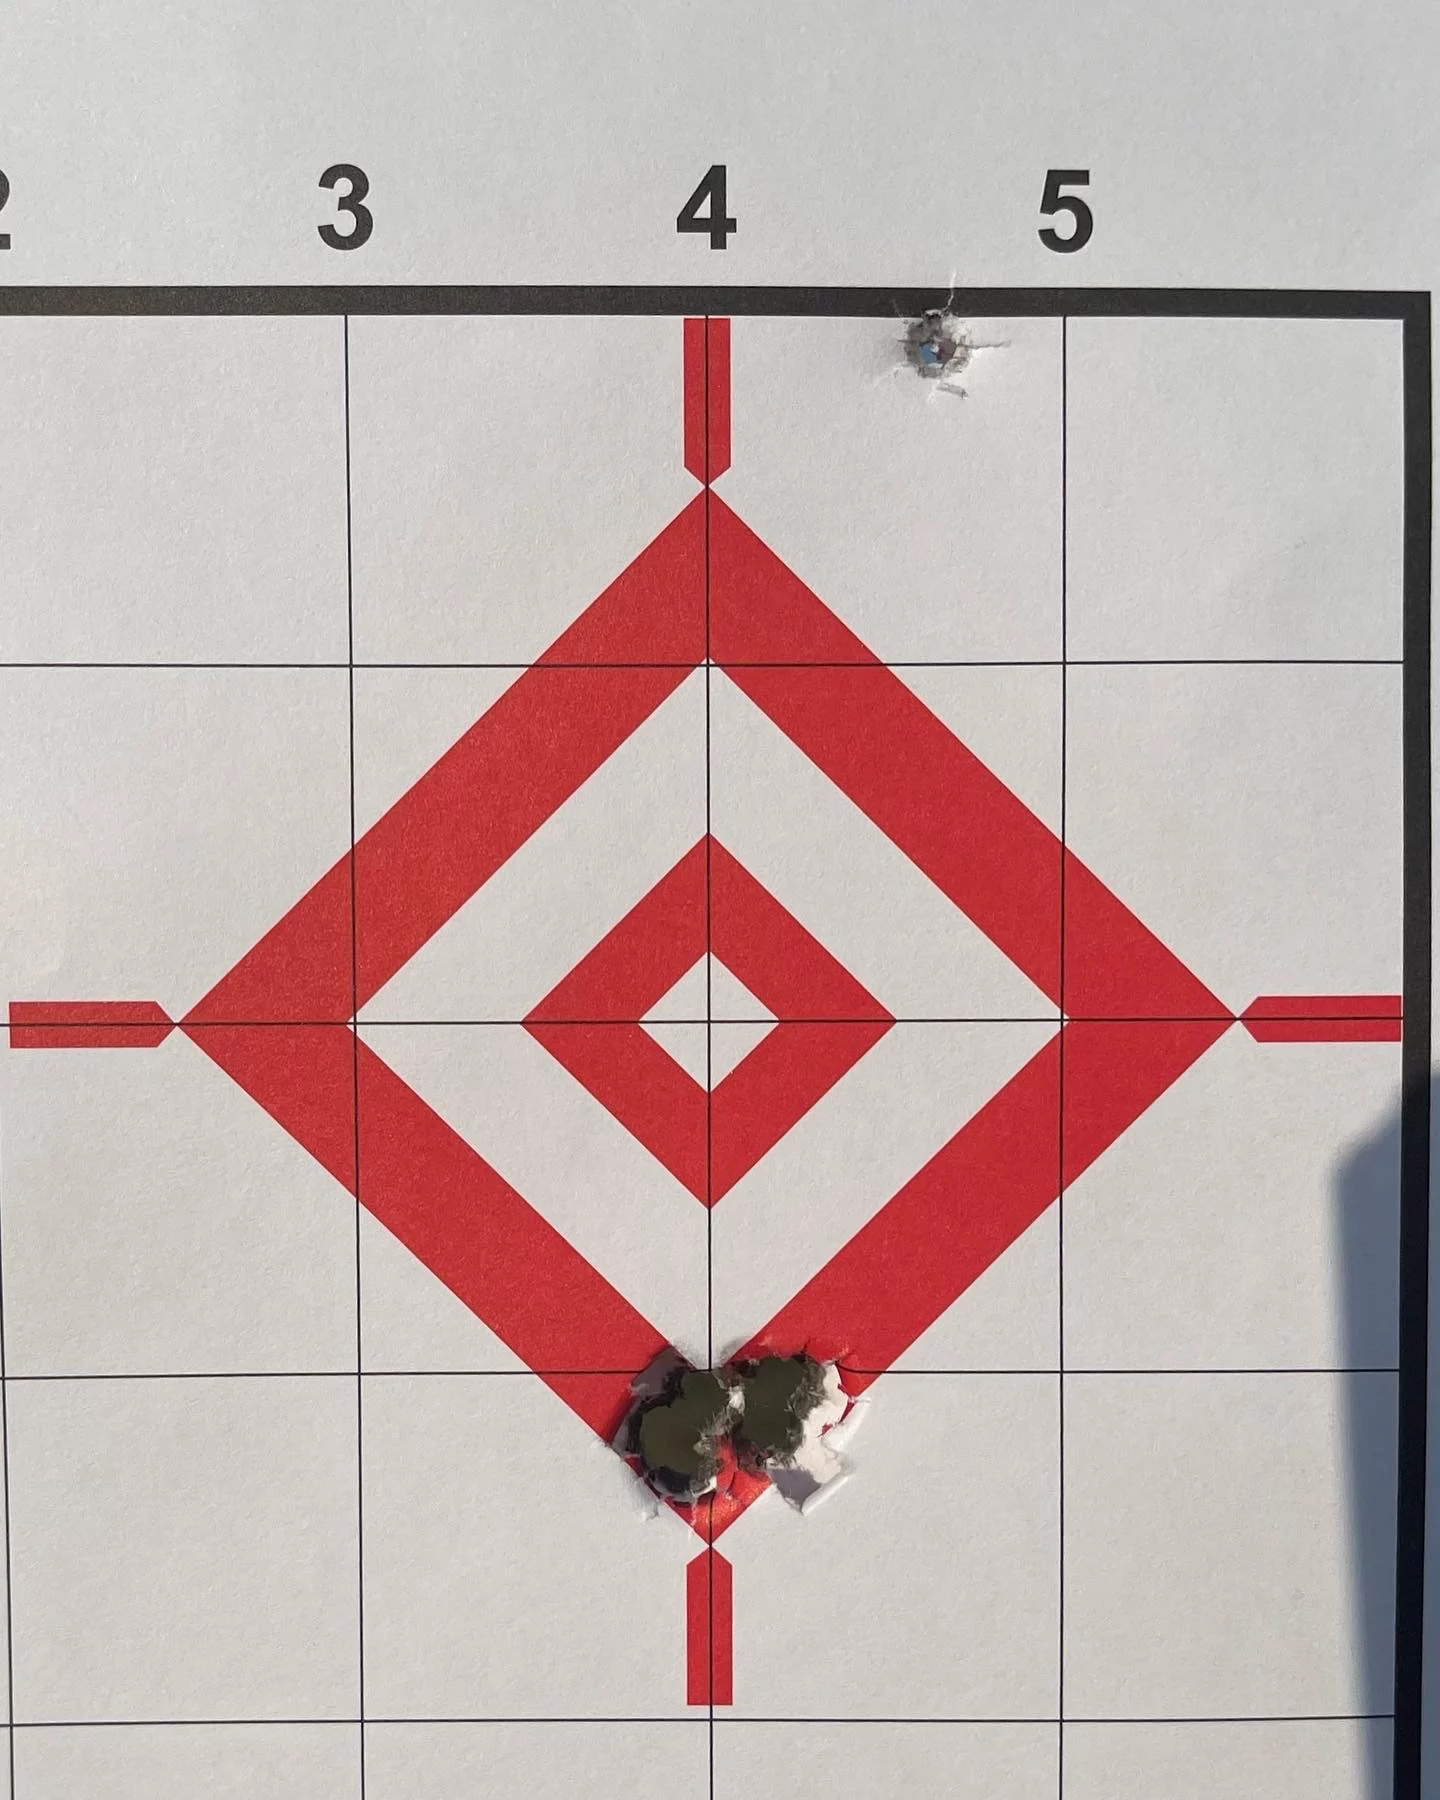
The image above illustrates the grouping size at 200 yards on a 6″ metal disc using a 6.5 CM rifle with a .5 MOA capability, a standard deviation of 10 fps in ammunition velocity, and a variable 5 mph wind. While the hit rate remains 100%, the grouping reveals a spread of nearly 4″ across 1,000 impacts. This occurs even at just 200 yards and demonstrates a key principle: as distance increases, the cone of accuracy naturally expands. A .5 MOA rifle will not produce tighter groups at extended ranges, as its inherent precision is limited by factors such as wind, ammunition consistency, and ballistic trajectory. Over a large enough sample size, the grouping size will consistently reflect this predictable dispersion pattern.
Same Rifle | 1000 yards | 10 fps SD
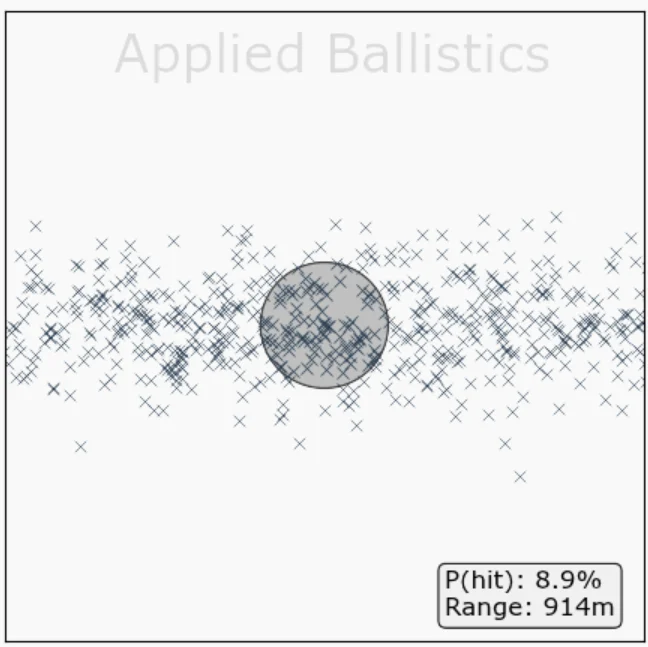
Same Rifle | 1000 yards | 20 fps SD

As you can see, the group’s patterning is the same. The expansion of the groupings due to SD differences of 10fps is also significant.
The next evolution of grouping at a manageable distance (100 yards and in) to achieve hits on targets at a further distance exists within the 50-yard zero and the “Battlefield Zero” or “Max Point Blank Range.”
50-Yard Rifle Zero and Variations
Battlefield Zero or Max Point Blank Range (MPBR_
Battlefield Zero, or Max Point Blank Range, is a rifle zero option allowing the shooter to effectively engage targets within an expected engagement range. It involves zeroing the rifle so that the bullet does not rise above or fall below a prescribed height over a specified distance. The advantage of battlefield zero is that it provides an effective rifle zero for shooting at different ranges without adjusting the sights within a ranged distance. However, it may not be as precise as other zeroing options. The end goal is to put effective shots on target within a bracketed distance.

Understanding the Expected Target Size with MPRB Zero
Planning for a specific target size and adjusting the zero accordingly is essential to effectively engage a target at varying distances. The target size dimension should be in relation to the expected target size for which any striking of the round achieves effective results. This dimension is called the “Vital Zone”
Vital Zone
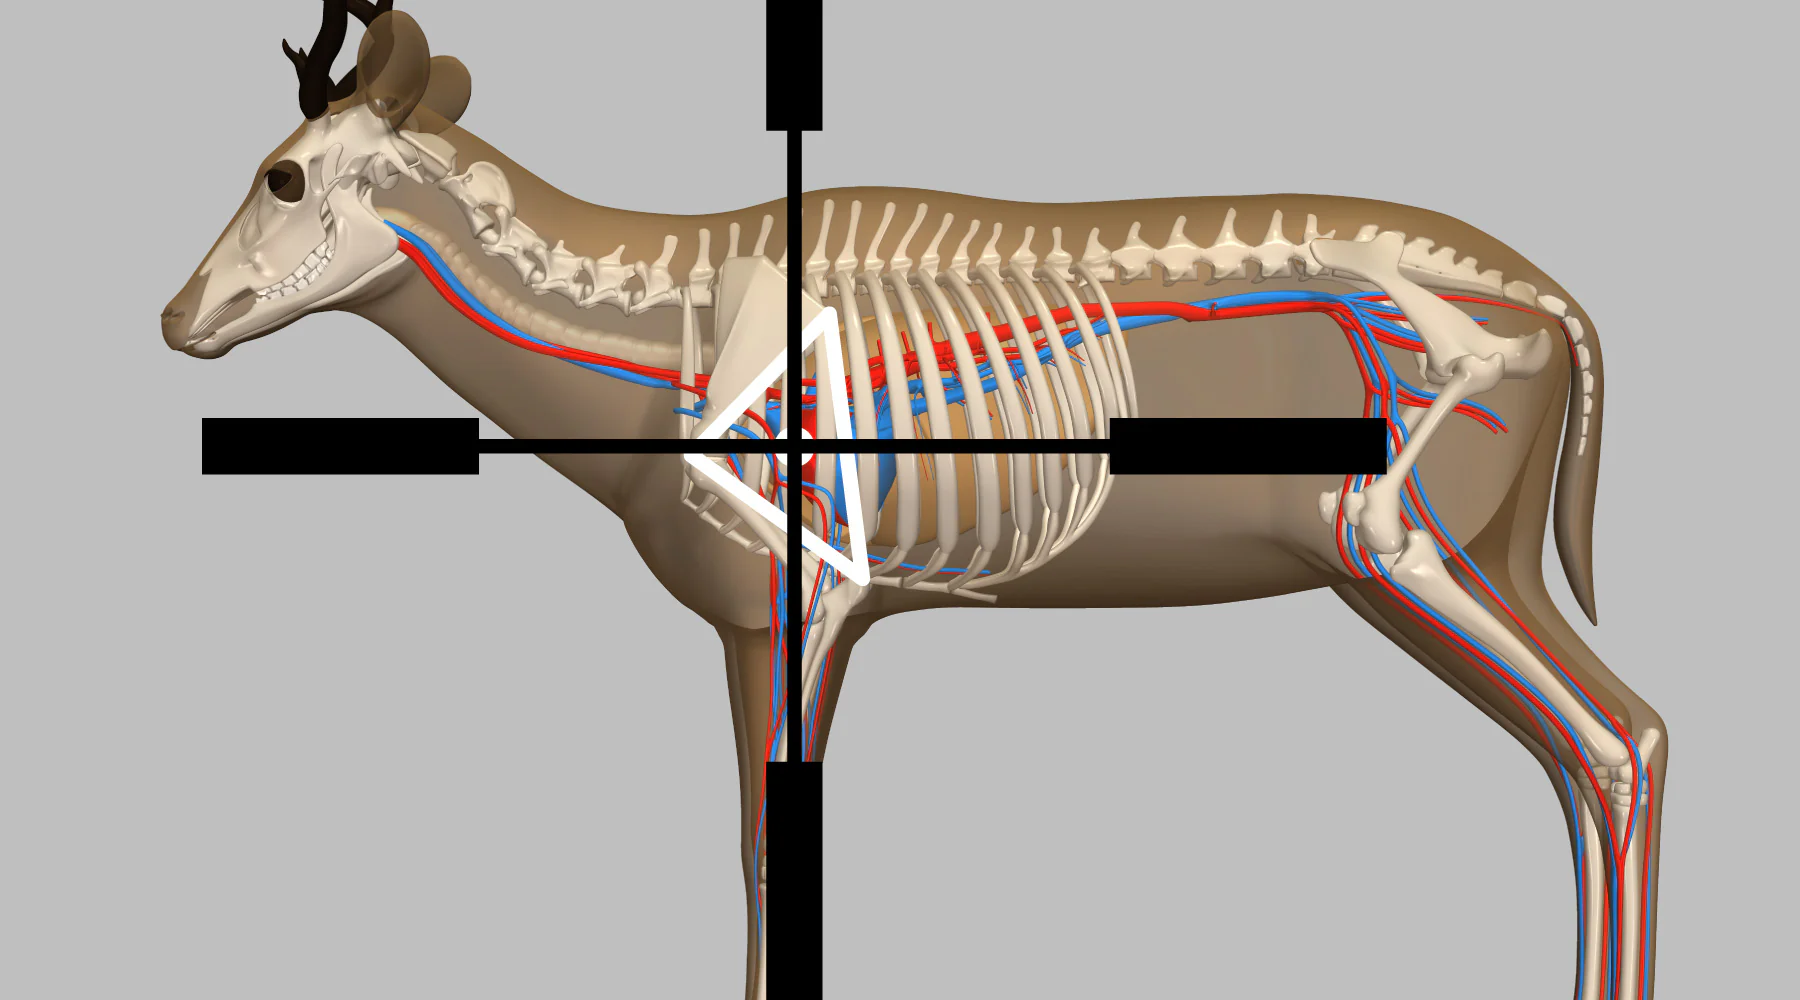
We must establish the acceptability for hitting within a specific diameter for the target. For example, a hunter’s target can be the area where the vital organs of the game being sought are located. As an illustration, using Elk, we can say that if a round impact within a 12” radius from the center of the vitals, it will achieve the desired effect. In other words, when holding to the center of the vital zone and executing the shot, a bullet impact 12” above or below that point will get meat in the freezer. For competitive shooting, you can utilize similar logic if the targets are standard and known sizes.
Setting Your Max Point Blank Range
There are crucial variables for you to acquire to determine your MPBR.
- Velocity
- Bullet Information (Ballistic Coefficient, Grain, Diameter, Length)
- Height over Bore
- Size of Target
| Rifle | Barrel Twist | Bullet Coefficient (G7) | Grain | Height Over Bore | Size of Target | Velocity |
|---|---|---|---|---|---|
| 6.5 PRC | 1:8 | 0.347 | 156 | 2.12 | 12″ | 2808 |
| AR15 | 1:8 | 0.243 | 55 | 3.5″ | 6″ | 3042 |
AR-15 MPRB Determination
The variables will be entered into the Applied Ballistics Calculator to build a load profile. From there, we will determine the range at which the AR-15 should be zeroed. We will adjust the zero until we get the utmost most terminal ordinate to be 1/2 the value of the Vital Zone Target. For example, with a 6″ target, we want to set the zero distance so that the maximum distance over the line of sight achieved is +3″. From there, we will then find out where the bullet passes back through the POA/POI and finally determine the distance where the bullet is -3″ below the POA. When we do this, we will know the maximum range where we can hold center of our vital zone and expect to get hits on target.
We will demonstrate the differences in results compared to the standard and expected 50/200 yard zero.
Different Zero Comparison Chart
The variables utilized are reprinted in the chart above.
| Zero Distance | Max Ordinate | Max Ordinate Range | POA/POI Range | Terminal Ordinate | Terminal Ordinate Range |
|---|---|---|---|---|---|
| 50/200 Yards | +4.29″ | 188 Yards | 317 Yards | -3.00″ | 355 Yards |
| 56.85 Yards | +3.00″ | 170 Yards | 283 Yards | -3.00″ | 327 Yards |
By adjusting the zero to a “non-standard” 56.85 Yards, the max point-blank range to strike a 6″ target will be valid out to 328 Yards. It is important to note that the height over bore is a vital dimension that accounts for this particular setup.
The zero is specific to this rifle setup and is why we call it a non-standard setup. The 50-yard zero does not comply with the 6″ vital radius in this instance. It is also important to note that the far zero range is +117 yards beyond the common 50/200 nomenclature.
The non-standard zero is usually achieved with a non-adjustable optic, although it can also be done with optics with a turret. Next, we will discuss a method for employing an MPBR with a scoped rifle while maintaining its 100-yard zero.
Scoped Rifle MPBR Determination
Once we have a rifle zeroed at 100 yards, the next step is simply to determine where to dial in elevation so that we achieve the maximum terminal ordinate, in this case, 6″ above the POA.
Let’s take the 6.5 Creedmoor example from the previous charts. We are going to take our Kestrel and use that to find the elevation dial on our turret to come up with the Rifle’s MPBR for a given target size.
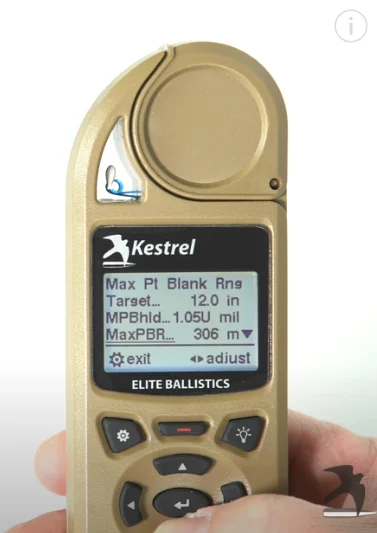
Example of the Kestrel Screen for MPBR Menu
For the 12″ Target, we will Dial 1.2U in Mils. The MAXPBR for this will be 371 yards, and the bullet will have a Far Zero of 315 yards.
Remember, MPBR is not a precision application; however, taking advantage of the MPBR requires solid ballistic coefficient data, a chronograph, and solid grouping fundamentals. MPBR can be utilized when accuracy is important, but dialing and holds are always preferred when precision is paramount. When Game quickly presents itself, and you have but seconds to respond, having your rifle already dialed to its MPBR can enable you to take the shot confidently and ethically. It should be understood that if your target is further out then 371 yards in this instance, you should have the luxury of more time to get settled onto the execution of the shot.
Other Zeroing Options
In addition to traditional zeroing methods like MPRB (Battlefield), several alternative approaches exist, including the 25/300-yard, 36-yard, and 10-yard zero. Each follows the same fundamental principles discussed earlier and depends on the specific system being used.
Shooters can experiment with these options to determine what best suits their needs. However, factors such as rifle twist, velocity, bullet ballistics, height over bore, and shooter consistency all play a crucial role in how a system performs for a given application.
In Conclusion
Precision rifle shooting requires careful consideration of multiple factors, including zeroing methods, caliber selection, and equipment choices. Shooters can experiment with various zeroing options, such as traditional zeroing, MPBR (Maximum Point Blank Range), and battlefield zero, to determine what best suits their needs.
Caliber and ammunition selection are equally important for achieving consistent accuracy. Using high-quality projectiles, properly matched brass, and precision-loaded ammunition can significantly enhance ballistic performance.
Additionally, a well-optimized rifle setup—including a stable chassis or stock, high-quality optics, and a reliable bipod—contributes to precision. Tools that provide atmospheric and ballistic data and secure and adjustable mounting solutions further refine a shooter’s ability to engage targets effectively at distance.
Ultimately, success in precision shooting depends not just on the rifle and ammunition but also on the shooter’s technique and discipline. Proper trigger control, maintaining a natural point of aim, and understanding factors like height over bore and ballistic coefficients are essential for consistent shot placement. With the right combination of knowledge, skill, and equipment, precision rifle shooting becomes both a rewarding challenge and a valuable capability.